Help
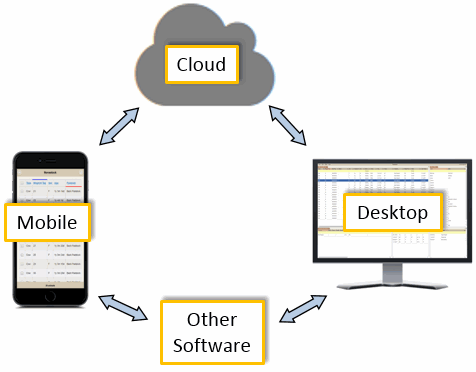
Novastock comprises desktop and mobile oriented web applications (webapps) and cloud storage for livestock data. The master data storage location is the cloud, however updates can be made on any device at any time, and then synchronised with the cloud for others (who have the relevant password) to view. Data can also be transferred to and from other software such as spreadsheets and other livestock management software. The following diagram summarises the approach:
The help provided on this page is relevant to the latest versions of both Novastock Desktop and Mobile.
Getting started with Novastock Desktop is very simple:
- Launch the app. Assuming you are yet to sign-up you will next see a login screen. Click Try With Example Data.
- Check out the default tables/graphs on the Farm Summary dashboard. Note that you can change what these display and drag them to different positions.
- Use the Main Menu button to go to the Animals page, then select an animal in the Main Animals Table and other information about it (Basic Details, Treatments, etc) will be shown in the adjacent details panels.
- Edit event data such as weights and treatments by selecting the row in the relevant Details Panel and then clicking the cell that you want to edit.
- Add event data by selecting an animal and clicking Edit > Add Event.
- Add a new animal by selecting Edit > New Animal. This will add a new item in the Main Animals Table, with some default values.
- Create an account via the home page to start adding your own data.
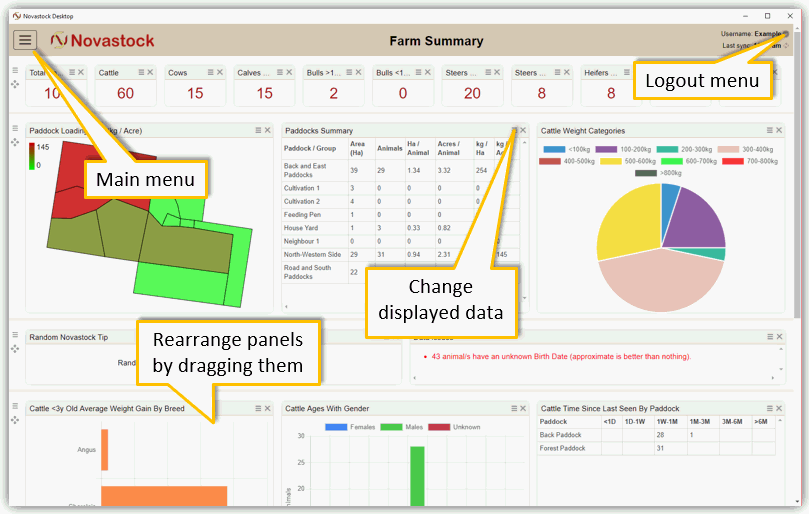
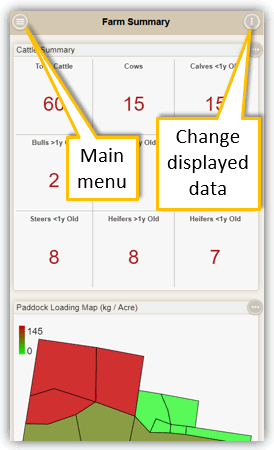
The Farm Summary dashboard is the opening screen of Novastock and summarises all of the data that you have entered in easy-to-digest tables, charts and maps. An example interface is shown below.
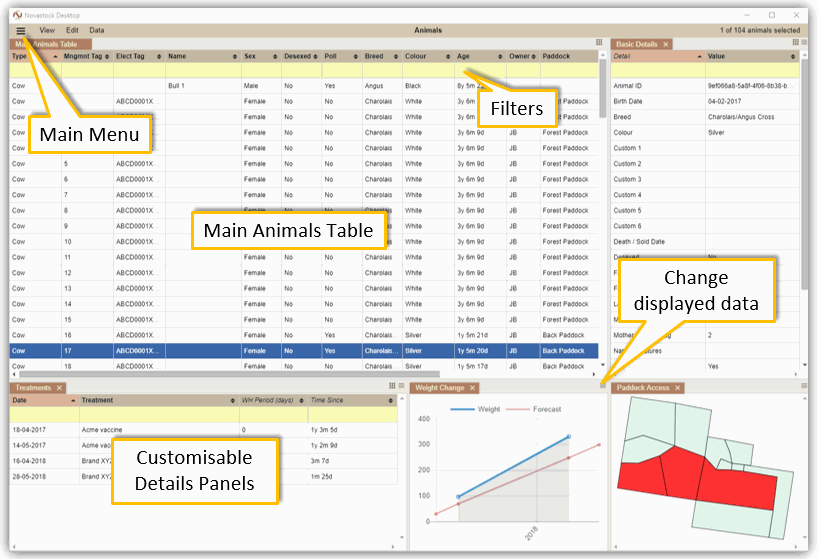
This interface is where you access and edit the records of each of your individual animals, with an example arrangement shown below. Along with the Main Animals Table, any number of additional details panels can be displayed, in any arrangement, showing other data tables, graphs or paddock maps.
When using tables:
- The top yellow row is for filters.
- Columns can be turned on and off as desired by clicking the small columns button at the top-right of the panel.
- If a column has a filter applied and the column is hidden, the filter will remain active. To see which hidden columns have active filters select the column display button. Active filters can be removed in the columns dialog if required.
- To sort the a table by a column click the relevant column header, and drag and drop the column headers to reorder them.
- Data can generally be edited directly where it is displayed; just select the row then click on the value that you want to edit. In some cases an editing dialog will appear.
- To edit the basic details of multiple animals, select the required animals (holding down Shift or Ctrl) and then edit the relevant item in the Basic Details table.
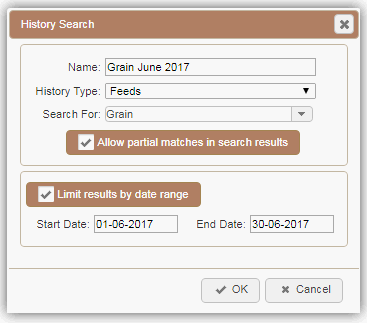
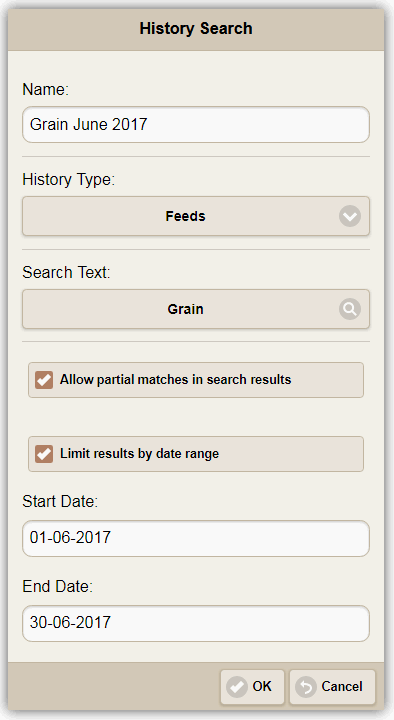
Special columns called History Searches can be added to the Main Animals Table. A History Search is a useful means of finding animals that have particular data in their histories, such as which animals got fed grain within a certain date range (as shown below).
To create a search select View > Add History Search, and after completing the dialog a new column will be added to the Main Animals Table with Yes or No values indicating whether the search was successful for that animal.
The Add Event tool is for data that is applicable from or on a given date, such as a treatment administered or a tag changed. This way the animal's history can be built up over time.
The tool has been arranged to enable multiple data types to be added on a given date, which reflects the most common situation, say for when a cow is in the crush. An example use of the tool is shown below:
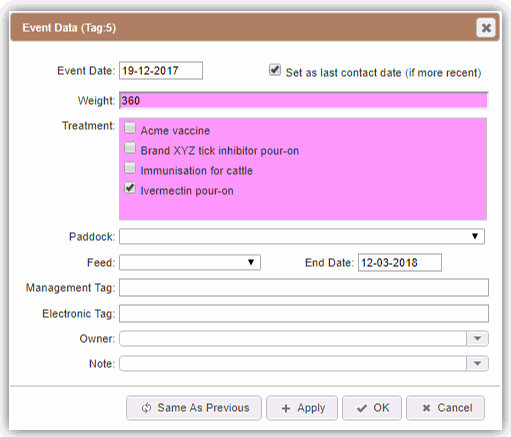
Some notes about adding data:
- This tool can be used for multiple animals simultaneously.
- Inputs are highlighted to make it obvious as to which data is being added.
- When assigning an animal to a paddock, just pick one of the paddocks within the paddock group (the paddock group name will not be available for selection).
- If assigning a feed to an animal and the feeding has not finished, leave the end date blank (then edit the feed record by adding the end date later).
- Modify / delete this data using the the relevant table in a Details Panel, or by using the Find / Replace History Records tool.
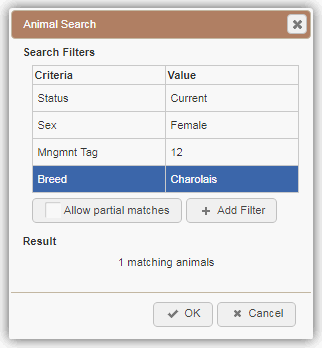
To pair an animal with a parent, edit its Father / Mother Management Tag or Electronic Tag value (you may need to ensure that column is displayed). If there is more than one animal that has the specified parent's tag, then you can narrow down to the right animal by clicking the Search button. Multiple search criteria lines can be entered in order to filter down to just one animal. Example criteria may be as shown below:
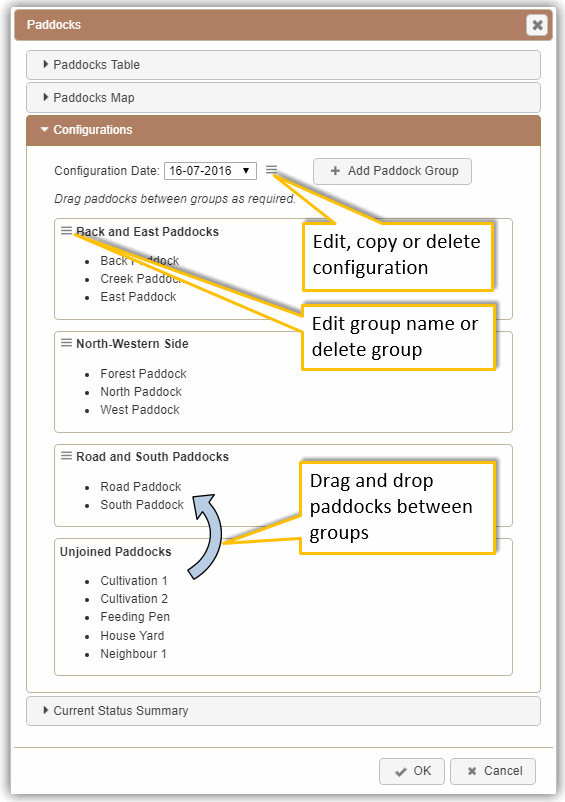
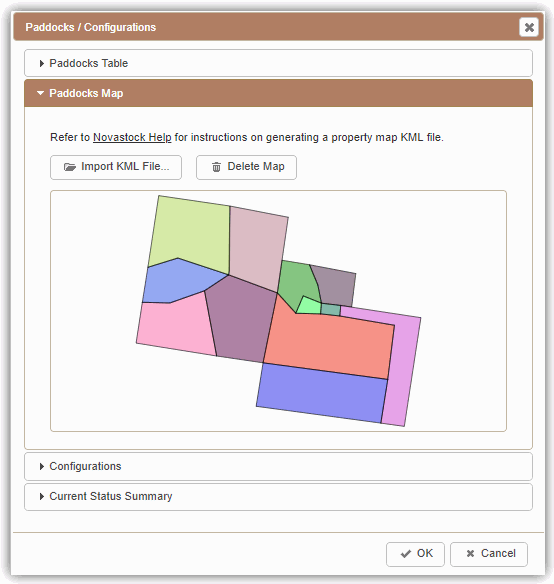
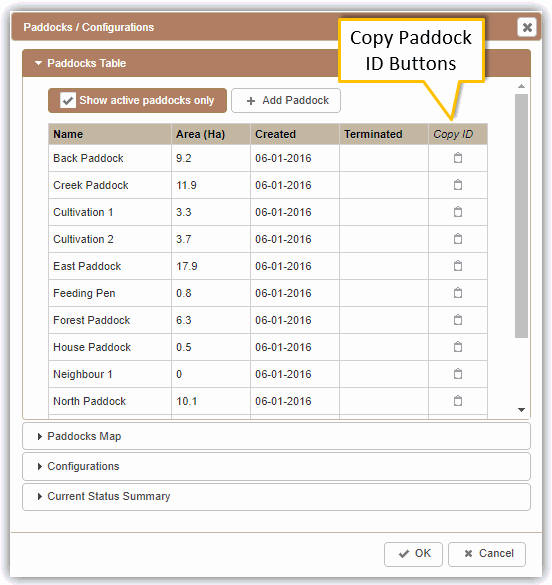
To be able to assign an animal to a paddock, the paddock must first be setup by selecting Paddocks from the Main Menu. The paddocks dialog is split into four sections:
- The list of individual paddocks, which can be edited like any other table.
- A paddocks map that can be imported from a KML file.
- Paddock configurations, where paddocks can be grouped on a certain date (for when a gate is left open between them).
- A summary of animal counts and paddock loadings.
After a paddock is added in the top section, it will automatically be listed in the configurations section, initially under Unjoined Paddocks. To join paddocks into a group, firstly create the group by clicking "Add Paddock Group", then drag the required paddocks into the new group.
An example paddocks configuation is shown below:
A couple of important notes regarding paddocks, to ensure that paddock loading history is maintained:
- If you change your paddocks configuration by opening/closing different gates, add a new configuration for the day you changed it and leave the old configuration there. Only the latest will be shown by default when opening the paddocks dialog.
- If you change fences so that some individual paddocks are now different, leave the paddocks in the listing and just enter their terminated dates. Then add the newly created paddocks. Terminated paddocks are only visible in this dialog if the "show active paddocks only" checkbox is off.
To be able to add a treatment to an animal, the treatment type must first be entered by selecting Edit > Treatment Types. An example listing may be as shown below:
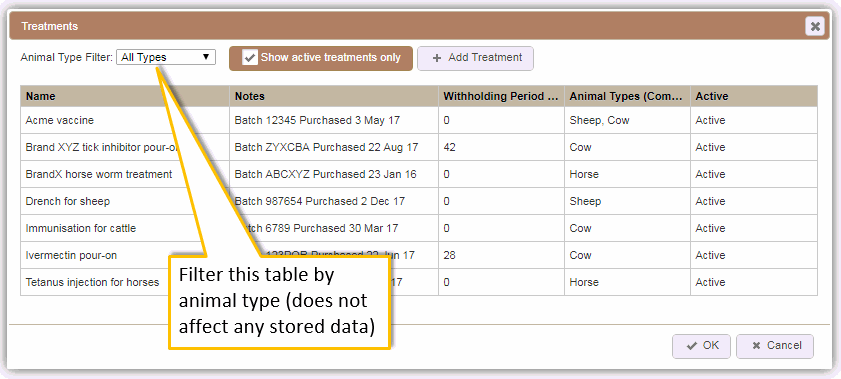
A couple of notes about this:
- If a treatment is no longer available (e.g. it has all been used) then just set it to Inactive. Then it won't show up in the Add Event tool but you will still have an historic record of it.
- The Animal Types column is used to filter the list of available treatments in the Add Event tool, based on the type of animal selected. This means that when entering a treatment administered to a cow for example, you won't have to scroll through all of the horse and sheep treatments to find the right one. Enter the types with commas seperating them, such as "Cow,Sheep,Horse".
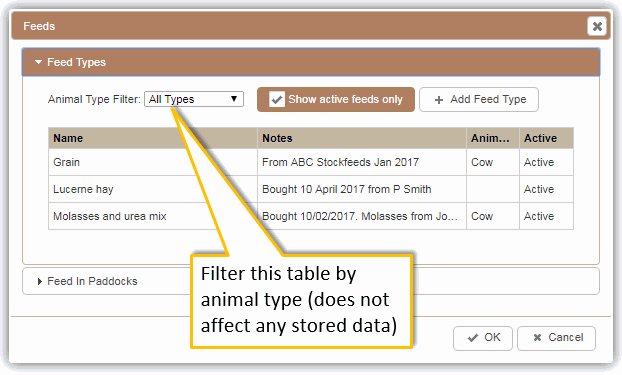
Feeds that are provided to animals can be tracked, either by assigning a feed directly to an animal (or group of animals), or assigning a feed to a paddock where animals are located. To setup feed types select Edit > Feed Types. The top section is where you manage feed types, and the bottom section can be used to assign feeds to paddocks. To assign feeds directly to animals use the Add Event tool.
An example feeds arrangement may be as shown below:
A couple of notes about this:
- If a feed is no longer available (e.g. it has all been used) then just set it to Inactive, then it won't show up in the Add Event tool, but you will still have an historic record of it.
- The Animal Types column is used to filter the list of available feeds in the Add Event tool, based on the type of animal selected. Enter the types with commas seperating them, such as "Cow,Sheep,Horse".
Novastock predicts animal weights between weighings, however to do that it needs to know approximate weight gain rates. These rates can be defined by a set of rules, which can be customised in many ways to suit your situation. To setup the rules select Edit > Weight Gain Rules.
An example rule set may be as shown below:
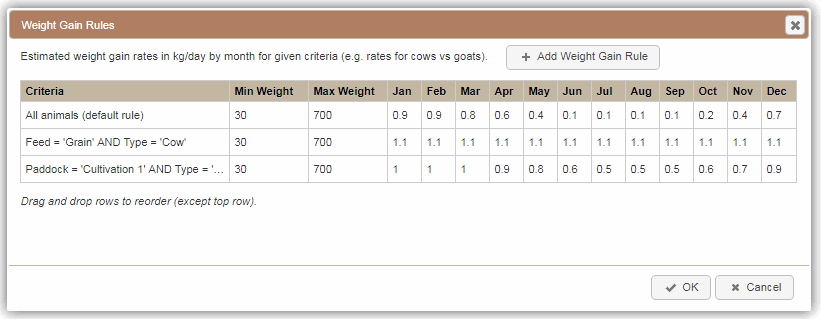
Some notes about these rules:
- The rules are scanned from top to bottom and the last matching rule found will be used. So in the example shown above, a cow located in Cultivation 1 and also being fed grain will adopt the final rule. Drag rows to change the rule order.
- A default rule of 0.5kg/day will be used if no others are entered.
- Use a negative number to enter a daily weight loss.
If there is a note that you enter against an animal often or you want to standardise on how a note is worded, you can make it a standard note. To do this, select Edit > Standard Notes and add it to the list.
If you change a standard note in this dialog, any existing notes assigned to animals will not be updated. To do a bulk edit of existing notes, use the Find / Replace History Records tool.
Reminders can be accessed via Edit > Reminders, and provide either recurring or non-recurring notifications. An example may be to follow up an initial vaccine with the booster injection. When due, the reminder notification is shown in the status bar at the top-right of the Animals screen.
Miscellaneous diary entries can be added in Novastock, such as "neighbour's bull found in heifer paddock". To add and view diary entries, select Edit > Diary.
History records such as management tags and weights can be edited individually for each animal via the relevant details panel, however bulk edits can be done by selecting Edit > Find / Replace History Records. Records can be searched for and then replaced or deleted en masse.
Select Data > Sync with Cloud to merge data between your device and the cloud. This will only transfer data that has been updated since your last sync so as to minimise sync time and data usage.
The export / import commands are found under the Data menu, and can be very useful in situations such as:
- Transferring specific animal history data to a new animal owner / manager.
- Making bulk data changes in a spreadsheet.
- Transferring data from / to another program (e.g. another livestock management program).
Some notes about exporting / importing:
- If transferring from / to another program, manual processing of the data will be required to get it onto the required format to suit Novastock and the other program.
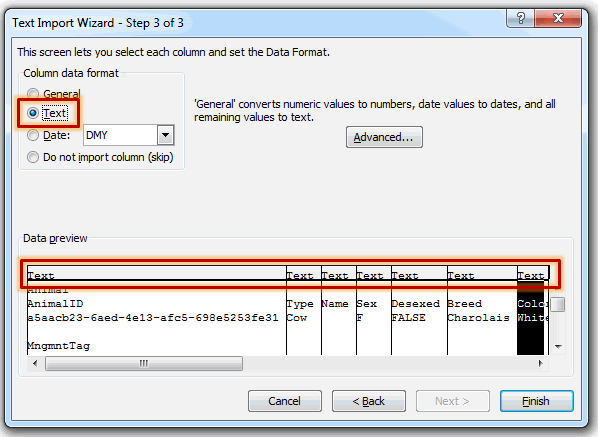
- When opening the exported file in Microsoft Excel, use the Text Import Wizard and ensure that all columns are treated as Text, as shown below. This will be similar with other spreadsheet programs, and ensures that the date format is maintained (prevents them from being treated as large numbers).
- To import data it should be in a tab-delimited text file, like in this example. To produce this using Excel, just save the spreadsheet as a "Text (Tab delimited)" file type.
Getting started with Novastock Mobile is very simple:
- Launch the app. Assuming you are yet to sign-up you will next see a login screen. Tap Try With Example Data.
- Check out the default tables/graphs on the Farm Summary dashboard. Note that you can change what information these display.
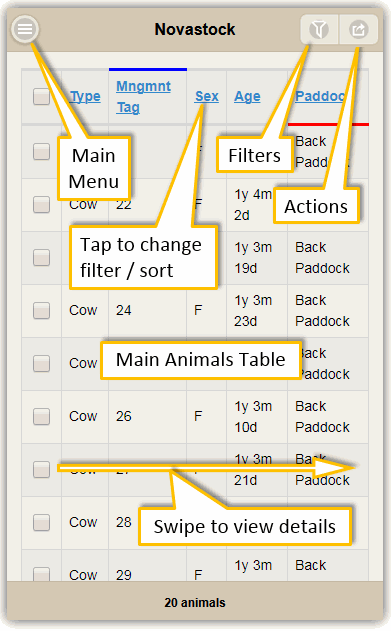
- Use the Main Menu button to go to the Animals page. View an animal's details by swiping it, then tap each section (Basic Details, Treatments, etc) to expand it.
- Edit event data such as weights and treatments by swiping the relevant row on the Animal Details page.
- Add event data by selecting an animal (tap and hold it for about a second) and selecting Add Event in the Actions Menu.
- Add a new animal by selecting New Animal from the Actions Menu, then add some details about the animal and press OK.
- Create an account via the home page to start adding your own data.
The Farm Summary dashboard is the opening screen of Novastock and summarises all of the data that you have entered in easy-to-digest tables, charts and maps. An example interface is shown below.
This interface is where you access and edit the records of each of your individual animals, with an example arrangement shown below. A few notes about it:
- Many types of columns can be shown or hidden from the Main Animals Table by selecting Edit Columns in the Actions Menu. Examples include management tag, age, weight, sex and mother's management tag, just to name a few.
- A blue bar above a column heading indicates that it is the sort column, and a red bar under it indicates that it has a filter applied.
- To sort by a column tap its header, then select an ascending or descending sort.
- To filter the animals that are displayed in the Main Animals Table, tap the column header that you want to filter by. You can filter by specific items, or add a Complex Filter (e.g. weights greater than 400).
- If a column has a filter and is hidden, the filter will remain active. To see which hidden columns have active filters (and to remove them), select Edit Columns from the Actions Menu. Note that a filter can also be removed from a column by tapping the column header, and then choosing Clear Filter from the Actions Menu.
- The details of each animal, including its historical data such as weights and treatments, can be accessed by swiping the animal.
- To select multiple animals tap and hold on the animal for about one second and checkboxes will appear on the left. You can edit the selected animals' details by selecting Details under the Actions Menu.
- Editing animals is done primarily via the Details page, but data such as weights and treatments can also be added by selecting one or more animals, then selecting Add Event under the Actions Menu.
Special columns called History Searches can be added to the Main Animals Table. A History Search is a useful means of finding animals that have particular data in their histories, such as which animals got fed grain within a certain date range (as shown below).
To create a search select View > Add History Search, and after completing the dialog a new column will be added to the Main Animals Table with Yes or No values indicating whether the search was successful for that animal.
The details of an animal (or multiple animals) can be viewed / edited by swiping an animal in the Main Animals Table (or by double-click if using a mouse). Basic details are shown as well as histories such as treatments and weights, with an example screenshot below:
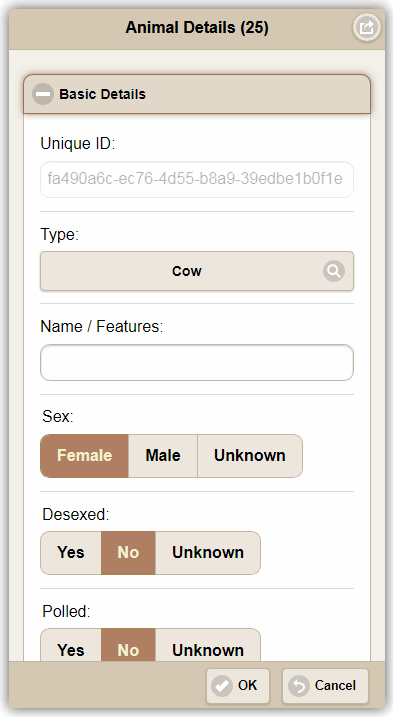
To edit or delete historical data (e.g. a treatment), just swipe the entry in the relevant animal history list on this page, and a subsequent edit dialog will appear.
The Add Event tool is for data that is applicable from or on a given date, such as a treatment administered or a tag changed. This way the animal's history can be built up over time.
To add event data, select at least one animal in the Main Animals Table by tapping and holding it for about 1 second, then select Add Event from the Actions Menu. The tool has been arranged to enable multiple data types to be added on a given date, which reflects the most common situation, say for when a cow is in the crush. An example use of the tool is shown below:
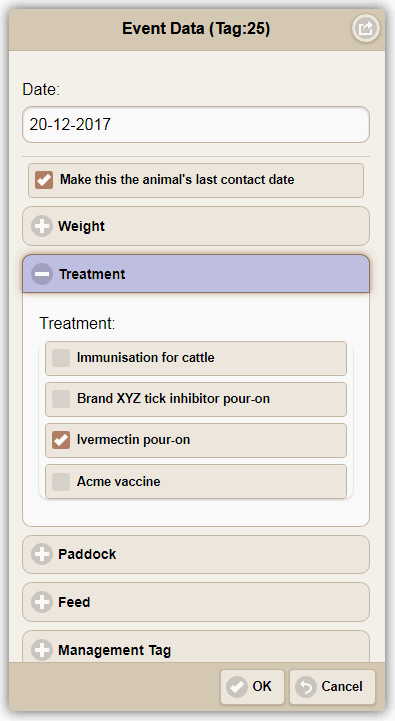
Some notes about adding data:
- This tool can be used for multiple animals simultaneously.
- Sections are highlighted to make it obvious as to which data is being added.
- When assigning an animal to a paddock, just pick one of the paddocks within the paddock group (the paddock group name will not be available for selection).
- If assigning a feed to an animal and the feeding has not finished, then leave the end date blank (then edit the feed record by adding the end date later).
- Modify / delete this data on the Animal Details page.
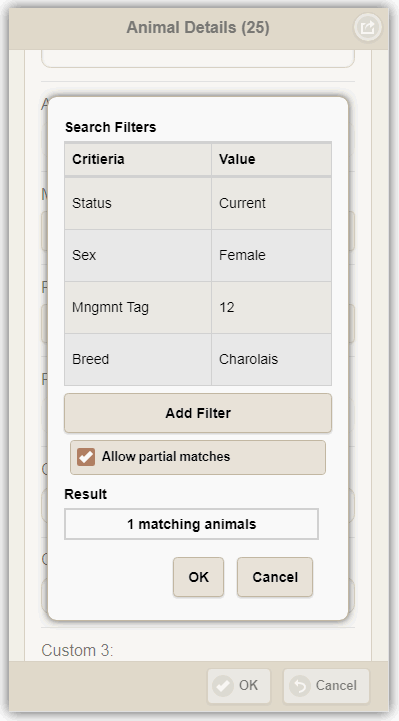
To pair an animal with a parent, go to the Animal Details page and in the Basic Details section press either of the Father or Mother Management Tag buttons. If there is more than one animal that has the specified parent's tag, then you can narrow down to the right animal by pressing the Search button. Multiple search criteria lines can be entered in order to filter down to just one animal. Example criteria may be as shown below:
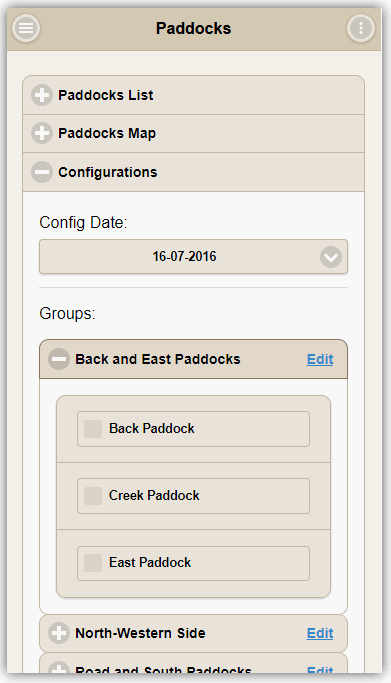
To be able to assign an animal to a paddock, the paddock must first be setup by selecting Main Menu > Paddocks. The paddocks page is split into four sections:
- The list of individual paddocks, which can be edited by swiping.
- A paddocks map that can be imported from a KML file.
- Paddock configurations, where paddocks can be grouped on a certain date (for when a gate is left open between them).
- A summary of animal counts and paddock loadings.
After a paddock is added to the Paddocks List (via the Actions Menu), it will automatically be listed in applicable configurations, initially in the Unjoined Paddocks group. To join paddocks into a group, firstly create a new configuration for the applicable date, then add a group to that configuration, then select the paddocks you want to group (they should be in the Unjoined Paddocks group) and move them to the new group. All of these steps are done using the Actions Menu.
An example paddocks arrangement is shown below:
A couple of important notes regarding paddocks, to ensure that paddock loading history is maintained:
- If you change your paddocks configuration by opening/closing different gates, add a new configuration for the day you changed it and leave the old configuration there. It will be collapsed out of view by default when opening the paddocks page.
- If you change fences so that some individual paddocks are now different, leave the paddocks in the listing and just enter their terminated dates. Then add the newly created paddocks. Terminated paddocks are only visible in this dialog if the "show active paddocks only" checkbox is off.
To be able to add a treatment to an animal, the treatment type must first be entered by selecting Main Menu > Treatments. An example listing may be as shown below:

A couple of notes about this:
- A treatment can be edited by tapping it in the list.
- If a treatment is no longer available (e.g. it has all been used) then just set it to Inactive. Then it won't show up in the Add Event tool but you will still have an historic record of it.
- When adding or editing a treatment, the Animal Types entry is used to filter the list of available treatments on the Add Event page, based on the type of animal selected. This means that when entering a treatment administered to a cow for example, you won't have to scroll through all of the horse and sheep treatments to find the right one. Enter the types with commas seperating them, such as "Cow,Sheep,Horse".
Feeds that are provided to animals can be tracked, either by assigning a feed directly to an animal (or group of animals), or assigning a feed to a paddock where animals are located. To setup feed types select Main Menu > Feeds. The top section is where you manage feed types, and the bottom section can be used to assign feeds to paddocks. To assign feeds directly to animals use the Add Event tool.
An example feeds arrangement may be as shown below:
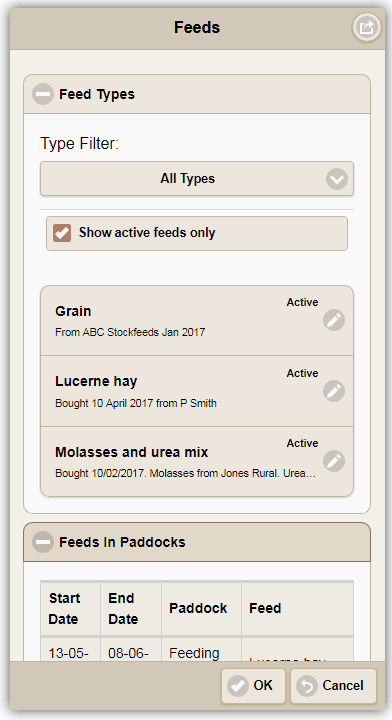
A couple of notes about this:
- If a feed is no longer available (e.g. it has all been used) then just set it to Inactive, then it won't show up in the Add Event tool, but you will still have an historic record of it.
- When adding / editing a feed type, the Animal Types entry is used to filter the list of available feeds in the Add Event tool, based on the type of animal selected. Enter the types with commas seperating them, such as "Cow,Sheep,Horse".
Novastock predicts animal weights between weighings, however to do that it needs to know approximate weight gain rates. These rates can be defined by a set of rules, which can be customised in many ways to suit your situation. To setup the rules select Main Menu > Settings > Weight Gain Rules.
An example rule set may be as shown below:
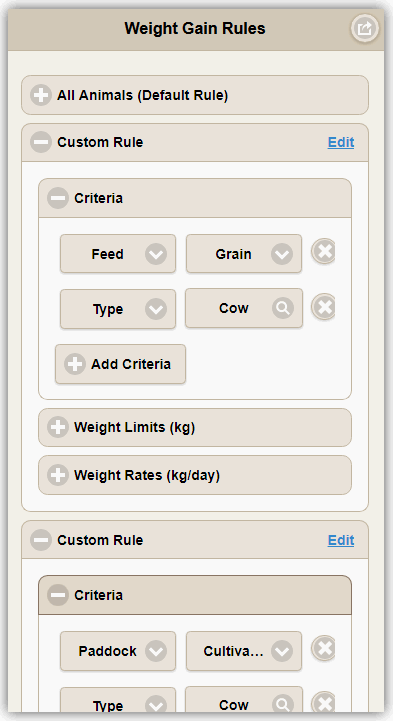
Some notes about these rules:
- The rules are scanned from top to bottom and the last matching rule found will be used. So in the example shown above, a cow located in Cultivation 1 and also being fed grain will adopt the final rule. Tap the Edit link on a Custom Rule to move it in the list.
- A default rule of 0.5kg/day will be used if no others are entered.
- Use a negative number to enter a daily weight loss.
If there is a note that you enter against an animal often or you want to standardise on how a note is worded, you can make it a standard note. To do this, select Main Menu > Settings > Standard Notes and add it to the list.
If you change a standard note in this dialog, any existing notes assigned to animals will not be updated. To do a bulk edit of existing notes, use the Find / Replace History Records tool in Novastock Desktop.
Reminders can be accessed via Main Menu > Reminders, and provide either recurring or non-recurring notifications. An example may be to follow up an initial vaccine with the booster injection. When due, the reminder notification is shown in the footer bar at the bottom of the Main Animals Table.
Miscellaneous diary entries can be added in Novastock, such as "neighbour's bull found in heifer paddock". To add and view diary entries, select Main Menu > Diary.
Select Sync with Cloud via the Main Menu to merge data between your device and the cloud. This will only transfer data that has been updated since your last sync so as to minimise sync time and data usage.
Creating a Paddocks Map
A paddocks map can be imported into Novastock Desktop via a KML file. After it's imported it will be available in both Novastock Desktop and Mobile. Creating a map allows data such as animal location or paddock loading to be displayed graphically. After importing a KML map file, an example paddocks arrangement might be like this (in Novastock Desktop):
KML files can be created using various mapping programs, however if you have a Google account then the following method could be used:
- Go to Google My Maps .
- Click the Create a New Map button, which will take you to a new map interface.
- Click the menu button (3 dots) next to Untitled map to change your map name.
- Locate your farm by zooming or searching.
- To draw paddocks it is usually best to be in satellite view mode. Toggle this using the Base map menu.
- Under the search bar are several buttons. Use the draw a line (add a line or shape) tool to draw the boundary of each paddock, one at a time. It doesn't matter if you make a mistake while drawing because you can edit the points later.
- Once you've finished drawing a paddock, a dialog will appear asking for the polygon name and description (the second box). Any name can be entered, however it is imperative that the description box contains the paddock ID. This can be obtained via the relevant Copy ID button in Novastock, like shown below. After pasting the ID (a very long code) into the description box in Google My Maps click Save.
- Draw the rest of your paddocks this way.
- Once finished, click the menu button (3 dots) next to your map name and select Export to KML/KMZ. Ensure the Export to a .KML file option is ticked, then click Download. The downloaded file can then be imported into Novastock.
Vessel Level Sensors
Vessel level sensors are a work in progress. Watch this space...
If you can't find the answer to your question here or on the FAQ page, send us an email at support@novastock.com.au